In this blog post, I will show you how to create an Intunewin file. The built-in methods in the Intune admin center make it easy to deploy MSI and Store apps. However, for .exe installers and more complex or custom deployments, you must use the Windows app (Win32 app) method.
For Win32 method, you’ll need to repackage the application into the Intunewin file format. In this blog post, we’ll guide you through creating this format and deploying it using Intune.
Contents
Step 1: Create 3 folders on your device
Example App: Notepad++
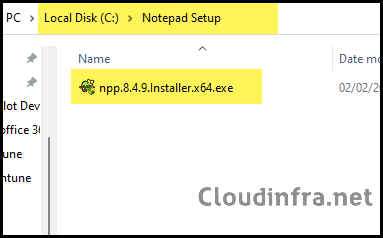
- C:\Notepad Setup: Copy all source files into this location.
- C:\Output: This folder is used for the Output file (.intunewin), which will be generated.
- C:\IntuneContentPrepTool: This folder will contain the tool that will generate .Intunewin file. The tool is called Microsoft Win32 Content Prep Tool.
Step 2: Copy files into the folders
- Download your Application binary files (.exe) or Setup files and copy them into the folder C:\Notepad Setup. [You can choose any folder name you like. I’m deploying Notepad++ in my example, so I used a relevant folder name.]
- Download the Microsoft Win32 Content Prep tool and extract it into the C:\IntuneContentPrepTool folder.
Step 3: Create an IntuneWin File
- Launch PowerShell as an administrator and navigate to C:\IntuneContentPrepTool.
- Run IntunewinAppUtil.exe and provide Source Folder, Setup File, Output Folder, and Catalog Folder Information.
- Source Folder: Enter the folder’s location where .exe files/setup files are stored.
- Setup File: Enter the name of the .exe file.
- Output folder: Enter the location where .Intunewin file will be generated.
- Catalog folder: Type N and press Enter.
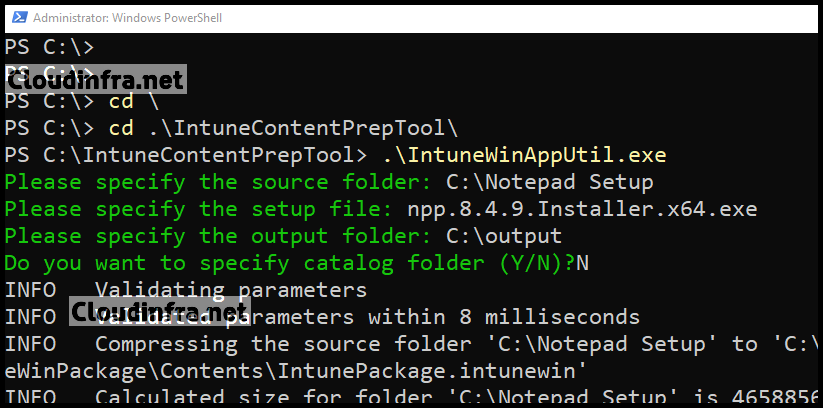
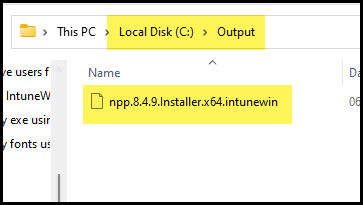
- The Intunewin file has been successfully generated in the Output folder located at C:\Output.
More Information
Now that you know how to create an Intunewin file using the above steps, you can also use the following command as an alternative method to create a .Intunewin file.
\IntuneWinAppUtil.exe -c <setup_folder> -s <setup_file> -o <output_folder>
Example:
.\IntuneWinAppUtil.exe -c "C:\Notepad Setup\" -s npp.8.4.9.Installer.x64.exe -o C:\output
What’s Next after creating .IntuneWin file
After you’ve created the .IntuneWin file, you can log in to the Microsoft Intune admin center and create an app deployment using the Windows app (Win32) method to deploy the .IntuneWin file.
If you need more detailed steps on Intune Win32 app deployment, you can check the following posts for additional information: